
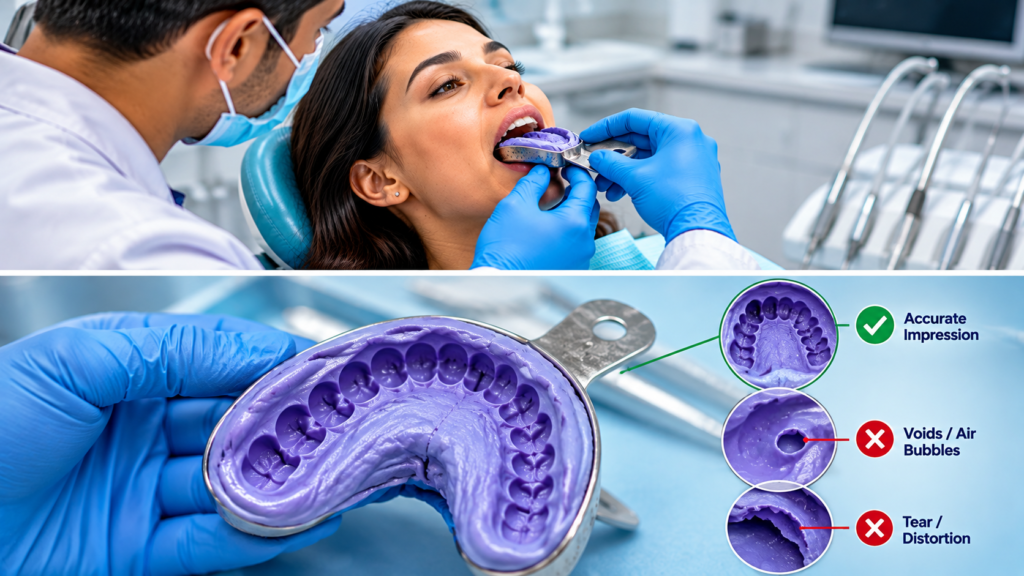
A dental impression may look like a simple clinical step, but its accuracy can influence everything that follows. A distorted impression can affect the quality of a diagnostic model, working cast, prosthetic restoration, or other laboratory-based dental work.
For dentists, the goal is not simply to obtain an impression that looks acceptable.
The real objective is to capture the required oral structures accurately and consistently so that the information transferred to the laboratory is as reliable as possible.
Small errors can occur at different stages, including tray selection, material preparation, soft-tissue management, seating, removal, and inspection. Understanding these common problems can help dentists improve their impression technique and reduce avoidable remakes.
What Makes a Dental Impression Accurate?
An accurate impression should reproduce the relevant teeth and surrounding structures clearly, without significant voids, pulls, tears, distortion, or other defects that could affect the intended clinical or laboratory outcome.
Accuracy depends on several factors working together.
These include:
- Appropriate tray selection
- Correct impression material handling
- Adequate preparation of the clinical field
- Proper material mixing and loading
- Correct tray positioning
- Controlled seating
- Adequate setting time
- Careful removal
- Immediate inspection after removal
No single step guarantees an accurate impression.
The final result depends on how well the entire impression procedure is controlled.
1. Choosing an Inappropriate Impression Tray
Tray selection is one of the first decisions that can influence impression quality.
A tray that is too small may fail to adequately cover the required structures. A tray that is excessively large may make material control and positioning more difficult.
The tray should provide sufficient space for the impression material while allowing the relevant oral structures to be captured properly.
How to Avoid This Mistake
Before mixing the material, check:
- Tray size and coverage
- Tray stability
- Extension around the relevant structures
- Available space for impression material
- Patient comfort
- Whether the selected tray is appropriate for the intended impression
2. Poor Material Preparation
Even when the correct impression material is selected, improper preparation can compromise the result.
Inconsistent mixing, incorrect proportions, inadequate working time, or poor handling can affect the material’s performance.
The dentist and clinical team should follow the manufacturer’s instructions for the specific material being used.
This includes understanding the recommended:
- Mixing ratio
- Mixing method
- Working time
- Setting time
- Temperature considerations
- Storage requirements
The important principle is simple:
The material should be prepared consistently every time.
3. Inadequate Moisture Control
Moisture can significantly affect impression quality, particularly when the material needs to capture fine details around teeth and soft tissues.
Saliva, blood, or other fluids can interfere with material adaptation and may contribute to voids, surface defects, or incomplete reproduction of important areas.
Moisture control should therefore be considered before the impression material is placed, rather than after a problem becomes visible.
How to Avoid This Mistake
Prepare the clinical field appropriately for the material and procedure being used.
Depending on the case, this may involve:
- Appropriate suction
- Gentle tissue management
- Controlling saliva
- Maintaining a clean working field
- Managing bleeding before impression making
The specific approach depends on the clinical situation and impression material.
4. Loading the Tray Incorrectly
The way impression material is loaded into the tray can influence how evenly the material reaches the areas that need to be recorded.
Insufficient material may result in incomplete coverage, while excessive or poorly distributed material can make tray seating difficult and increase the risk of unnecessary movement.
The material should be distributed appropriately across the tray before it is positioned.
A Practical Point
Once the material has been prepared, avoid unnecessary delays.
Every impression material has a specific working time. The tray should be loaded and positioned within the recommended working period rather than allowing the material to begin setting before proper seating.
5. Applying Uneven Seating Pressure
Once the tray is positioned, unnecessary movement or uneven pressure can distort the impression.
A common mistake is repeatedly moving the tray after it has been seated.
The aim should be to position the tray correctly and maintain it in a stable position while the material sets according to the manufacturer’s instructions.
Why This Matters
If the tray moves during setting, the material may not reproduce the oral structures accurately.
This can result in:
- Distorted margins
- Incomplete surface detail
- Uneven material thickness
- Loss of important anatomical information
Controlled seating and stability are therefore important parts of impression technique.
6. Removing the Impression Too Early
An impression may appear set on the surface while the material has not yet reached the required setting condition throughout.
Removing it prematurely can distort the impression and affect dimensional accuracy.
The appropriate setting time depends on the material being used, so the manufacturer’s instructions should always be followed.
Do not judge setting only by appearance.
Allow the material to reach its recommended setting time before attempting removal.
7. Failing to Inspect the Impression Immediately
Getting the impression out of the mouth is not the final step.
The impression should be carefully inspected before accepting it.
Look for:
- Missing areas
- Voids
- Tears
- Tray show-through
- Distorted regions
- Inadequate detail reproduction
- Areas affected by moisture
- Separation between material and tray
If a significant defect affects the required clinical information, it may be better to identify the problem immediately rather than sending an unreliable impression for further processing.
This simple inspection step can prevent an inaccurate impression from becoming a larger laboratory or clinical problem.
8. Common Impression Defects Dentists Should Recognize
Not every impression that comes out of the mouth is suitable for clinical or laboratory use. Recognizing defects early is important because a small-looking problem may affect the accuracy of the final result.
Voids and Air Bubbles
Small air bubbles can appear when the material is mixed, loaded, or applied incorrectly. If a bubble occurs over an important tooth surface or margin, the impression may not reproduce that area accurately.
The location of the defect matters as much as its size.
Incomplete Detail Reproduction
If important tooth surfaces, preparation margins, or surrounding structures are not captured clearly, the impression may not provide enough information for the intended purpose.
This can happen because of inadequate material adaptation, poor positioning, moisture contamination, or insufficient material coverage.
Tears or Distorted Areas
Thin sections of impression material can tear during removal, particularly around undercuts or narrow spaces.
An impression may also become distorted if the material is moved during setting or removed incorrectly.
The key is to inspect the entire impression rather than checking only the main tooth surfaces.
9. When Should an Impression Be Rejected?
A common clinical mistake is accepting an impression simply because “most of it looks fine.”
The correct question is:
Does the impression accurately capture all the information required for the intended procedure?
If an important area is missing, distorted, torn, or poorly reproduced, repeating the impression may be more appropriate than proceeding with an unreliable record.
This decision should always depend on the clinical purpose of the impression and the significance of the defect.
A careful inspection immediately after removal can therefore save time later and reduce avoidable remakes.
10. How Can Dentists Reduce Impression Remakes?
Improving impression quality is usually about controlling the entire workflow rather than fixing one isolated step.
Before starting, confirm the tray, material, clinical field, and required equipment.
During the procedure, pay attention to:
- Material consistency
- Working time
- Tray loading
- Moisture control
- Stable seating
- Setting time
- Controlled removal
After removal, inspect the impression carefully before proceeding.
This simple prepare → perform → inspect approach can make impression procedures more consistent.
Why Hands-On Training Can Help Improve Impression Technique
Dental impression techniques involve details that can be difficult to understand fully from written instructions alone.
Hands-on learning allows a dentist to see how tray selection, material handling, positioning, and removal affect the final impression.
For dentists developing their practical skills, supervised training can also provide an opportunity to identify technique-related problems and understand how to correct them.
At Kaamat Dental Academy, practical dental skill development can help learners connect clinical concepts with hands-on application through structured training.
Frequently Asked Questions
The objective is not simply to learn one impression technique. It is to develop a better understanding of why each step matters and how small procedural decisions can influence the final result.
What is the most common cause of an inaccurate dental impression?
There is no single cause. Problems can arise from tray selection, material handling, moisture control, positioning, setting, removal, or defects within the final impression.
How do I know if a dental impression is accurate?
Inspect whether all clinically relevant areas are reproduced clearly and check for voids, tears, distortion, missing areas, and other defects that could affect the intended outcome.
Should a defective dental impression always be repeated?
Not necessarily. The decision depends on the location and significance of the defect and the purpose of the impression. If important clinical information is compromised, repeating the impression may be appropriate.
Why is tray selection important?
The tray needs to provide suitable coverage and allow adequate space for the impression material while maintaining stable positioning during the procedure.
Can hands-on training improve dental impression skills?
Structured practical training can help dentists understand material handling, tray positioning, clinical workflow, and common technique-related problems more effectively through guided practice.
Final Takeaway
A good dental impression is the result of careful preparation, controlled technique, and thorough inspection.
Choosing the right tray, preparing the material correctly, controlling moisture, maintaining stable seating, respecting setting time, and checking the final impression can all contribute to a more reliable clinical record.
For dentists, improving impression technique is not about memorizing a checklist. It is about understanding how each stage affects the next one.
And when practical skills need to be strengthened, structured hands-on dental training can provide a useful environment for learning, practice, and professional development.
